Models
Note
- This section is mainly for GT3 for the time being.
- It is not yet possible to create cars with more than one color.
This is a guide to get started with importing or exporting models from or to GT3 and GT4.
Dumping Models
Requirements
Dumping
Models are located within the following folders:
GT3 Model Folders
Model file names are based on RACINGMODIFY in the Car Database/ParamDB.
| Path | Description |
|---|---|
cars/day |
Models for tracks on day setting |
cars/eve |
Models for tracks on day setting i.e Seattle |
cars/night |
Models for tracks on evening setting i.e Special Stage Route 5 |
menu/cars |
Menu models |
Car Model List
A list of car names & their model files for GT3 is available here.
GT4 Model Folders
Model file names are based on CAR_VARIATION -> VARIATION in the SpecDB.
| Path | Description |
|---|---|
car/lod |
Race models |
car/menu |
Menu models |
car/open |
Race models (cars with open interior) |
Run GTPS2ModelTool as such to dump a model for viewing:
Dumping will output cars in obj, png formats for viewing externally. This will output a folder next to the car file with models as obj format which you can browse.
Note
- Dumping models does not make them suitable for re-importing.
- Dumping works with
Tex1, GTTR, GTTW, GTM1, CAR4, MDLS, PRM0, PRZ0, GTBRfiles. - If you are viewing with Blender, Y and Z are swapped.
Custom Models
- Understanding how to edit game files - GT3 / GT4
- Modeling Knowledge
- Modeling Software ( Blender, 3ds Max...)
- GTPS2ModelTool
The first thing you should do if you haven't is to start dumping original models in order to be familiar with their requirements (vertex count, texture formats, etc).
You'll be able to observe that cars are generally made up of 3 LODs, and also have their own meshes for reflections. While cars can be made with one single LOD, it is recommended to create at least three to closely match original model setups.
Checklist
Here is a check list of things to keep in mind while creating models.
- The scale is
1 unit = 1 meter - Polygons must be triangles so make sure that there are no quads, otherwise make a copy of your model and triangulate it.
- Your triangulated model will be processed by the tool and converted to tri-strips which is what the games uses.
- The main concern is model file size and textures will take most of it. It is always recommended to use paletted texture formats such as 4bpp which is the default and should always be used in general (it is okay to rarely use 8bpp for more colors). Remember to account for LODs.
- For GT3, the max car model file size is
688.128bytes (672Kb) for race models,819.200bytes (800Kb) for menu models.
- For GT3, the max car model file size is
- Texture dimensions must generally be a power of two i.e 16x16, 32x16, etc.
- Try to reuse textures as much as possible.
- When working on things like windshields, you could store only half of the texture and mirror it across both sides.
- If you need to spread a color across a mesh, use a 1x1 texture to save on size.
- Ensure that your modeling software outputs
Kdin your materialmtlfile - otherwise causes models to look very dark.
Creating a ModelSet
To create a model set, make a .yaml file in your model folder. These are the main config files you use in order to build a ModelSet.
Sample File w/ documentation
Models:
  # List of models. Every model will be rendered on every render tick (shapes to render depending on current LOD.)
  MyPlaneModel: # Model name, can be anything really
    LODs: # List of LODs, not optional
      plane.obj: # LOD0 - Each LOD must be pointing to a obj file

        # Parameters for each mesh, optional
        MeshParameters:

          # Target mesh name (in obj)
          plane:

            # If 'UseExternalTexture' is true, this mesh uses an external texture provided by the engine
            # This may be for instance, the track's reflection texture
            UseExternalTexture: false

            # Model render commands. If provided, these commands will be executed BEFORE the shape is called/rendered
            # The parameters will be reset (unless the next shape uses same ones)
            # Preferably meshes should be in order of obj declaration if you are using many parameters (otherwise clogs command list & file size)
            # Command List: https://nenkai.github.io/gt-modding-hub/ps2/model_render_commands/
            Commands:
            # - AlphaFunction(ALWAYS, 0)
            # - AlphaFail(ALWAYS)

        # Callback when lights are off/on
        TailLampCallback:
          Off:
            - Brake_Off # Use shape 'Brake_Off' when tail lamps are off
          On:
            - Brake_On  # Use shape 'Brake_On' when tail lamps are on

      plane1.obj: # LOD1
        # ...

  # <More models here if needed>

############################
# Configuration for textures
############################
Textures:
  MyModel/MyTexture.png: # Should match paths in the .mtl file

    # Format of the texture. Available formats:
    # - SCE_GS_PSMT4 (4bpp, 16 colors palette) [DEFAULT]
    # - SCE_GS_PSMT8 (8bpp, 256 colors palette)
    # - SCE_GS_PSMT32 (32bpp)
    Format: SCE_GS_PSMT4

    # Wrap Mode S/T - X/Y axis texture wrapping. Available modes:
    # - SCE_GS_REPEAT
    # - SCE_GS_CLAMP
    # - SCE_GS_REGION_CLAMP [DEFAULT]
    # - SCE_GS_REGION_REPEAT
    WrapModeS: SCE_GS_REGION_CLAMP
    WrapModeT: SCE_GS_REGION_CLAMP

    # Repeat Width/Height - How long to repeat texture when using repeat mode
    # MUST be a power of two
    # RepeatWidth: 32
    # RepeatHeight: 32
Then to create a model:
Tips
- Pay attention to any warning the output may have. Creating a model will also always dump the output for viewing.
- The order of meshes added to the model set is alphabetical. Do keep this in mind when using commands (especially for reflection shapes which should appear after their base shape).
- If you just wish to test the model, you can insert it directly into an existing car model by overwriting bytes starting from the first
GTM1header (provided it doesn't overlap with other model components). You can usevw0020for the Beetle which is used in the first license test. - If you wish to look more at the output model file, grab 010 Editor and the appropriate GTM1 template.
Reflections
For shape reflections, you need to duplicate your base shape into another one which will be used solely for reflections. The mesh must overlay the base shape - same vertex positions.
- The base texture should be textured.
- The reflective shape should not be textured or have a material assigned.
- The reflective shape should have vertex colors. It is not mandatory, but original game models seems to use them. They should appear after every
vstatement in your obj file as such that you havev <x> <y> <z> <r> <g> <b>. UseExternalTextureshould be set to true for the reflection shape.- Three commands must at least be set for the shape:
- Optionally, three more can be used (based on original models i.e va0012):
FogColor(0)EnableDestinationAlphaTestUnkGT3_3_4f- Note: don't mind the name, command purpose is unknown. Only used in GT3.
Vertex Colors with Blender
Make sure that you are at least using 3.3. To export a mesh with vertex colors:
-
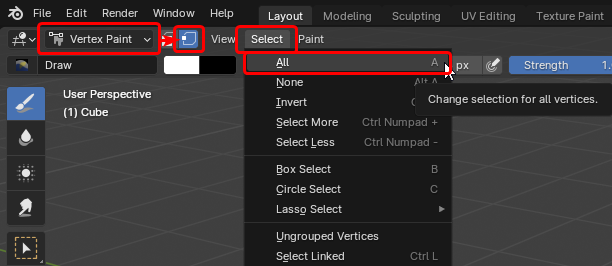
Go into Vertex Paint mode, Vertex Selection, then select all the vertices (or press A)
-
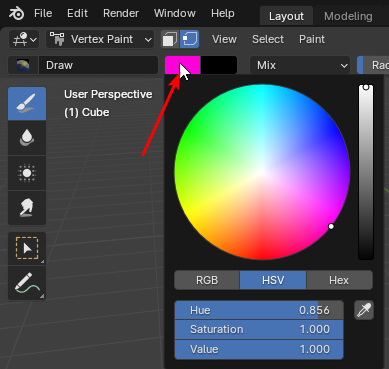
Select the current edit color
-
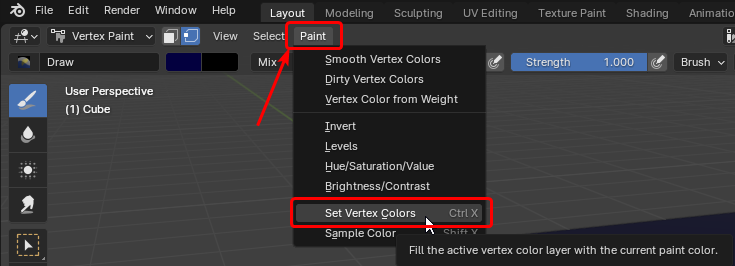
Apply edit color to all vertices (or press Ctrl+X)
-
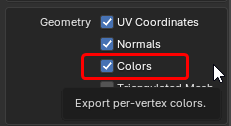
Make sure that Geometry->Colors is enabled when exporting to obj.
Do note that preview is only available in Viewport Shading view.
Sample Models
Two samples are provided with GTPS2ModelTool:
Plane_With_Taillamp_Callback- A simple texture plane with two lods, withBrake Offtext when brakes are not active,Brake Onwhen active.Reflection_Sphere- A sphere model composed of two shapes - the base shape, and the reflective shape.
Creating a Tire file
You can either reuse one from an existing model using the split-car-model or make one from scratch.
Warning
Making one from scratch requires a texture file maker which is not yet released.
To create a tire file:
Creating a Wheel file
You can either reuse one from an existing model using the split-car-model or make one from scratch.
A wheel file requires a model set to be made.
To create a wheel file:
Creating a Car Info file
The car info file contains setup information for a specific car such as:
- Camera Positions (known as Onboard Cameras)
- Front Light data
- Night Brake Light data
- Night Brake Light Flare data
- Collision Particle positions (i.e when the car collides with the road at high speed)
- Tire Indices for which actual compound to use per tire type
- Brake Parameters for which brake texture to use (in GT3 textures are inside
race/brake.binwhich can be dumped) - Exhaust Back-fire Particle data (unused in GT3)
You can reuse one from an existing model using the split-car-model.
It will be outputted as a .json file which can be easily edited with a text editor.
Creating a Car Model
Ensure that you have created the following files:
- One model set (
.mdl) for the car - One wheel file for the wheel (can be reused from an existing car)
- One tire file for the tires (can be reused from an existing car)
- One car info (
.json) file (can be reused from an existing car)
Once you have all of the four components required for a car, create a .yaml file as such
Note
You can also point to .yaml files for each of these components (model set, tire or wheel), and they will be recursively built.
Of course, update the paths to their proper names.
GTPS2ModelTool make-car-model -i <path_to_yaml> -o <output final car model file path>
Like model set creation, pay attention to any warnings or errors.
If everything went well, starting from here, you can edit the SpecDB using GTDataSQLiteConverter to edit/add the car.
Collision Box
In GT3, the collision box is calculated from the RACINGMODIFY database table, using ModelFront/ModelRear/ModelWidth/ModelHeight.